SketchUp 101: A Beginner’s Step-by-Step Guide to 3D Modeling for Architecture Students and Young Professionals
This guide will walk you through everything you need to know to get started with SketchUp, from the basics to helpful tips and common mistakes to avoid. Let’s dive into SketchUp...
Are you an architecture student, young professional, or someone just diving into the world of 3D modeling? SketchUp is a fantastic tool that makes designing easy, fun, and accessible to beginners. This guide will walk you through everything you need to know to get started with SketchUp, from the basics to helpful tips and common mistakes to avoid. Let’s dive into SketchUp and see how you can start creating your designs today!

Step 1: Setting Up Your Workspace
Before you start modeling, it’s essential to set up your workspace correctly to ensure a smooth experience.
Create a New File: Open SketchUp and select “File > New” to start a fresh project. Depending on your template, you might already be in a 2D view.
Switch to Top View: Go to “Camera > Standard > Top” to look directly down at your workspace, making it easier to draw floor plans.
Activate Parallel Projection: Go to “Camera > Parallel Projection” to eliminate perspective distortion and ensure accurate 2D drafting.
Figure 1: Top View and Parallel Projection Setup
Step 2: Drawing Your 2D Floor Plan
Creating a 2D floor plan is the foundation of your 3D model. This step helps you focus on the layout before adding any detailed elements.
Use the Line Tool: The Line tool (pencil icon) allows you to draw edges, the basic components of your model. Click to start and click again to finish each line.
Figure 2: Use the Line Tool
Add Circles: Use the Circle tool to create round shapes by defining the center point and radius.
Figure 3: Add Circles with the Circle Too
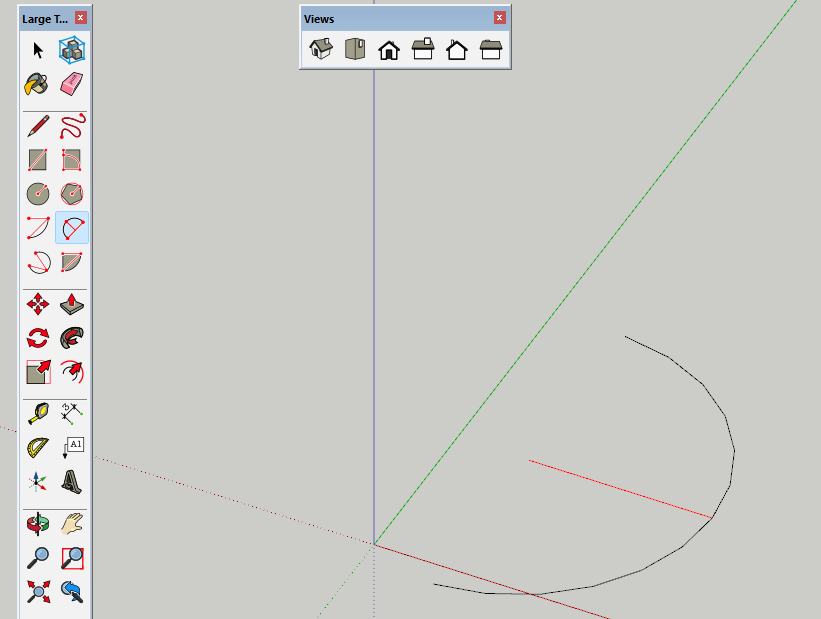
Draw Curves with Arc Tools: Choose from multiple Arc tools to draw curved edges that add a dynamic touch to your design.
Figure 4: Draw Curves with Arc Tools
Step 3: Bringing Your Design to Life in 3D
Once your 2D plan is ready, it’s time to transform it into a 3D model.
Use the Push/Pull Tool: Select the 2D shape and use the Push/Pull tool to extrude it upwards, creating walls. This tool is key to turning flat plans into 3D structures.
Add Details After Extrusion: Start with the basic structure, and then add windows, doors, and other elements once the walls are up. This approach simplifies the modeling process.
Figure 5: Use the Push/Pull Tool to Extrude 2D to 3D
Essential Tools for SketchUp Drafting
Eraser Tool
The Eraser tool helps you clean up your design by removing unwanted edges. Keep in mind that erasing edges can also remove the faces they define.
Single Click to Erase: Click on the edges to delete them individually.
Click and Drag to Erase Multiple Edges: Use this method to erase several edges at once, saving time.
Figure 6: Eraser Tool in Use
Offset Tool
The Offset tool is perfect for creating parallel edges and adding consistent details like window frames or door trims.
Offset All Edges: Click on a face to offset all its edges evenly.
Offset Selected Edges: Preselect edges to offset only those, allowing for more precise adjustments.
Figure 7: Offset Tool for Consistent Edges
Tape Measure Tool
The Tape Measure tool is a versatile feature for measuring distances and creating guides to keep your design accurate.
Measure Distances: Click between two points to see the measurement in the lower-right corner of your screen.
Create Guides: Use guides to align and position elements within your model accurately.
Figure 8: Measuring with the Tape Measure Tool
Tips and Tricks for Using SketchUp Efficiently
Learn Keyboard Shortcuts: Master shortcuts like ‘L’ for Line and ‘P’ for Push/Pull to speed up your work.
Organize Your Model: Use layers and groups to separate different parts of your design, making it easier to edit.
Save Your Work Frequently: SketchUp can occasionally crash, so save your progress often to avoid losing work.
Common Mistakes to Avoid in SketchUp
Drawing in Perspective View: Always set your camera to Top view and Parallel Projection when drafting in 2D to avoid distortion.
Overloading Your Model with Details: Keep your model simple at first. Add details gradually to prevent performance slowdowns.
Ignoring Measurements: Use the Tape Measure tool to ensure all dimensions are correct. Precision is vital, especially in architectural work.
Start Your SketchUp Journey Today!
SketchUp is an excellent tool for anyone wanting to explore 3D modeling, whether for architectural design or personal projects. By following these steps, you can start creating models that look professional and accurately represent your ideas. Practice regularly, explore its features, and you’ll be modeling like a pro in no time!
Take Your Skills to the Next Level
Now, begin your architectural future by downloading our FREE Basic Architecture Design Package with Lumion file! Discover the power of rendering and the endless possibilities of architectural design. To begin, please click the following link to obtain the file on our website:
Home:
https://portfolio.hotrongnhan.org
Take advantage of this great chance to improve your skills and bring your ideas to life. Download today to open the door to architectural excellence!
Join Over 4,000 Students on Udemy
Excited to announce that the Lumion rendering course I've created on Udemy has attracted over 4,000 registrations! This course is tailored for architecture enthusiasts.
Check it out here: https://www.udemy.com/course/just-necessary-lumion-courses-from-basic-to-intermediate/?referralCode=4816CE05A8F30867FD14
Moreover, an exciting gift for aspiring architects is a free access code to experience the course. Drop me a message to get the code! Embark on this fresh, creative journey with us! Thanks for reading Just Necessary | Design! Subscribe for free to receive new posts and support my work.
Happy modeling!


