
SketchUp 101: Mastering Components – The Complete Beginner’s Guide
Ever felt overwhelmed by the endless repetition of creating the same elements over and over in your SketchUp projects? You’re not alone.

Ever felt overwhelmed by the endless repetition of creating the same elements over and over in your SketchUp projects? Or perhaps you’ve wished for a way to neatly organize and reuse parts of your models? You’re not alone. That’s where components come in. Whether you’re an architecture student or a professional just starting with SketchUp, learning how to effectively use components will drastically improve your workflow and model efficiency.
In this comprehensive guide, we’ll walk you through everything you need to know about using components in SketchUp, step by step. From understanding what components are to creating your own, this guide will give you the knowledge you need to elevate your modeling game. Let’s dive in!
What Are Components in SketchUp?
Components in SketchUp are reusable parts of a model that save you time and make your projects more organized. Think of them as mini SketchUp files inside your main model. When you create a component, you’re essentially creating a self-contained file that can be used repeatedly in your model and even in other projects. The best part? Any changes you make to one instance of a component are automatically reflected in all other instances!
Why Should You Use Components?
Using components provides several major advantages, especially in large or complex models:
File Size Reduction: Since SketchUp only needs to store one instance of a component, even if it’s used many times, your file size remains small.
Easy Editing: Need to tweak something? Edit one instance of a component, and all other instances will update automatically.
Simplified Organization: Components show up in the Outliner, making it easier to manage large models with multiple elements.
Reuse: You can save components for future use, which means once you create something (like a window, door, or piece of furniture), you can reuse it in other projects.
Exploring the Components Dialog Box
The Components Dialog Box is the hub for managing all your components in SketchUp. It’s where you can access, organize, and insert components into your model. To open it, simply go to Window > Components.
Key Areas in the Components Dialog Box
Info and Buttons
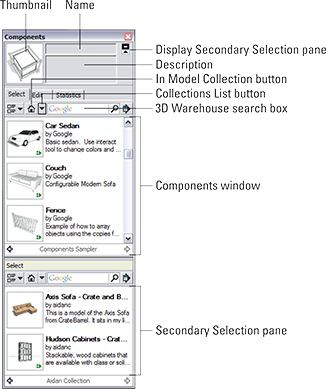
Name: Displays the name of the selected component. You can edit the name if the component is from your model. For default components or those from online collections, the name is not editable.
Description: Not all components have descriptions, but you can add one when you create or edit a component in your model.
Display Secondary Selection Pane: This button opens a second window where you can view multiple component collections at once.

Fig.2 - The Components dialog box The Select Tab The Select tab is where you view, organize, and choose components. Here’s what you’ll find:
In Model Collection: SketchUp automatically tracks the components you’ve used in your model and stores them here. Every SketchUp file has its own In Model collection, containing only the components that are part of that specific model.
Collections List: You’ll see both local collections (components stored on your hard drive) and online collections from the 3D Warehouse. Note: You need to be online to access components from the 3D Warehouse.
3D Warehouse Search Box: You can search for components in the 3D Warehouse directly from here. Just type in what you’re looking for, press Enter, and the search results will appear below.
Components Window: This displays the components available in your currently selected collection. You can click on any component to use it in your model. Components with a green arrow are Dynamic Components (more on those later).
View Options Button: Allows you to switch between different display modes for your components.
Collection Details Menu: Here, you can manage your collections with options like:
Open a Local Collection: Load a folder on your computer as a component collection.
Create a New Collection: Handy for grouping components you frequently use.
Save as a Local Collection: Save the components in your current view as a new collection.
View in 3D Warehouse: Opens the selected collection in the full 3D Warehouse window.
Add to Favorites: Allows you to save components from the window to your Favorites for quick access later.
The Edit Tab The Edit tab provides options for modifying components that are part of your In Model collection. If you want to make more complex changes, this is where you do it.
The Statistics Tab (Fig.3) If you love data, the Statistics tab is for you. It provides a detailed breakdown of the selected component’s geometry (edges, faces, etc.), which is helpful when managing the complexity of your model. This is especially useful if you’re concerned about file size and computer performance.

Fig.3 - The Statistics tab of the Components dialog box:.

How to Create Your Own Components
Ready to make your own components? Follow these simple steps to turn any part of your model into a reusable component:
Select Entities: Highlight the part of your model (edges, faces, or groups) you want to turn into a component.
Create the Component: Go to Edit > Create Component to open the Create Component dialog box. (Fig.4)
Name and Describe: Give your component a meaningful name. Adding a description can help if you plan to reuse this component in the future.
Set Alignment Options: If needed, choose how your component should align with surfaces in your model (for example, furniture should always align with the floor).
Replace Selection with Component: Check this option to automatically replace the selected geometry with the new component.
Click Create: Congratulations! You’ve just created your first component.

Fig.4 - The Create Component dialog box

Advanced Component Features
1. Select Instances
If you have multiple instances of a component in your model, you can select all of them at once. Simply right-click the component in the Components Dialog Box and choose Select Instances. This trick is a huge time-saver, especially when dealing with large models.
2. Replace Selected
Want to swap one component with another? You can! Select the instances you want to replace, right-click the new component, and choose Replace Selected. For example, you can use simple placeholder objects (like boxes) during modeling and swap them with detailed objects later.
3. Creating Windows and Doors
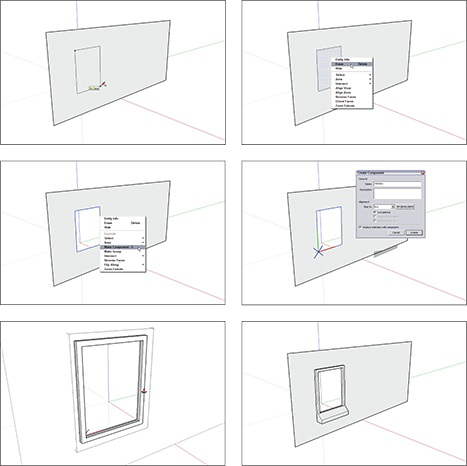
One of the most practical uses of components is creating windows and doors. SketchUp even allows you to make components that cut through surfaces, like walls. Here’s how to do it:
Draw a rectangle on a vertical surface.
Delete the face to create an opening.
Select the edges of the opening, right-click, and choose Make Component.
Ensure Glue to Any and Cut Opening are selected in the Create Component dialog box.
Click Create, and your new window or door component is ready!

Fig.5 - Creating Windows and Doors
Dynamic Components: Adding Flexibility to Your Models
Dynamic Components are advanced components with special abilities. They can be set up to scale intelligently, animate, or even have multiple configurations. For example, a dynamic door might open and close when clicked. While anyone can use existing Dynamic Components, you’ll need SketchUp Pro to create new ones.
Editing, Exploding, and Locking Components
Right-clicking a component in your model opens a context menu with options to modify it. Here are a few useful ones:
Edit Component: Modifies all instances of a component in your model simultaneously.
Make Unique: Creates a new, unique component from a selected instance, allowing you to edit it without affecting the others.
Explode: Breaks the component back into regular geometry.
Lock: Prevents a component from being accidentally modified. To unlock it, right-click and select Unlock.
Accessing Ready-Made Components from the 3D Warehouse
SketchUp’s 3D Warehouse is a treasure trove of ready-made components. Whether you need trees, furniture, or even entire buildings, you’ll find it all here. If you can’t find what you need for free, websites like Form Fonts offer premium components for a small subscription fee. The good news? These high-quality models can save you hours of work.
Final Thoughts: Why Components Matter
Components are the backbone of efficient modeling in SketchUp. By mastering their use, you’ll save time, reduce file sizes, and keep your projects organized. Whether you’re working on a small room design or a large architectural project, components will make your life easier and your models more professional.
So, go ahead—start experimenting with components in your next project and see how they can transform your SketchUp experience. Happy modeling!
Start Your Architectural Journey with a Free Design Package!
Now, begin your architectural future by downloading our FREE Basic Architecture Design Package with a Lumion file! Discover the power of rendering and the endless possibilities of architectural design. To begin, please click the following link to obtain the file on our website:
https://portfolio.hotrongnhan.org/
Take advantage of this great chance to improve your skills and bring your ideas to life. Download today to open the door to architectural excellence!
Excited to announce that the Lumion rendering course I've created on Udemy has attracted over 4,000 registrations! This course is tailored for architecture enthusiasts.
Check it out here: Lumion Course on Udemy.
Moreover, an exciting gift for aspiring architects is a free access code to experience the course. Drop me a message to get the code!
Embark on this fresh, creative journey with us!