
SketchUp 101: Step-by-Step Tutorial for Creating Your First Plan
Want to start using SketchUp but don’t know where to begin? This beginner-friendly guide will walk you through creating your first design plan step by step.

Getting Started with SketchUp: Step-by-Step Guide

1. Understanding the SketchUp Interface
Before jumping into your first project, familiarize yourself with the interface:
Toolbar: Your essential tools like Line, Rectangle, Push/Pull, and Orbit are located here.
Drawing Area: This is where you’ll create your design.
Measurements Box: SketchUp allows you to type in exact measurements for precise modeling.

2. Create Your First Plan
Now, let’s create a basic floor plan in metric units.
Switch to a 2D View:
Go to Camera → Standard Views → Top to get an overhead view of your workspace.
Switch to Parallel Projection by going to Camera → Parallel Projection. This view helps you draw precise 2D plans without perspective distortion.
Draw the Building Perimeter:
Select the Line tool, and start drawing the outline of your building. Let’s start by drawing a wall 5,000 mm long. Simply click to start the line, drag the mouse along the green axis, type “5000” (for 5,000 mm), and press Enter. The line resizes to exactly 5,000 mm.
Now, draw the second wall perpendicular to the first one, making it 3,600 mm long along the red axis. Type “3600” and press Enter
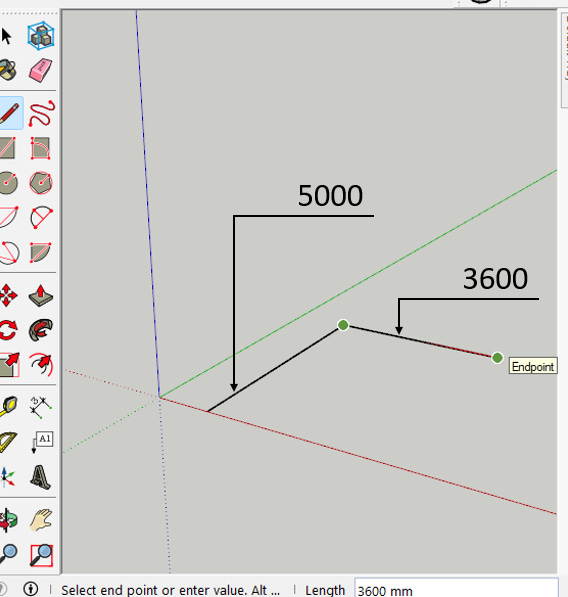
Fig. 3: Start by drawing an edge 5,000 mm long; then draw a perpendicular edge 3,600 mm long. Complete the Outline:
Continue drawing the remaining walls until you return to the starting point. If you make a mistake, use the Eraser tool to remove unwanted lines or go to Edit → Undo to step back.
Once you’ve drawn all the walls, you’ll have a closed perimeter, and SketchUp will automatically create a face (a solid surface) within the walls.
Fig. 4: The completed interior perimeter of my house.

Offsetting and Grouping the Exterior Walls
Once you have your basic outline, let’s give the exterior walls some thickness and organize the model by grouping. Here’s how:
Offset the Wall Thickness:
Select the Offset tool from the toolbar. Click inside the perimeter of your building, then click outside to create a second larger outline.
Type "200" (for 200 mm, a common wall thickness), and press Enter.
Clean Up the Edges:
Sometimes there will be extra edges where alcoves or irregular shapes are involved. Use the Line tool to close off any unwanted sections, ensuring uniform thickness throughout.
With the Eraser tool, delete any extra or unwanted edges, leaving you with two distinct faces: one for the floor and one for the exterior wall. Group the Exterior Wall:
Once your walls are ready, select the face representing the exterior wall and go to Edit → Make Group.
Grouping the walls allows you to edit them independently from other elements, such as floors, doors, and windows. This step is key for managing complex designs later on.
By completing this step, you’ve taken your model to the next level and are now on your way to becoming an intermediate SketchUp user!
Adding the Interior Walls
Next, it’s time to add the interior walls, and this is where guides will become your best friend.
Create Guides for Interior Walls:
Use the Tape Measure tool to create guides for your interior walls. Click on the edge of your floor plan, drag the cursor to the right or left, type in the distance you want (e.g., 1600 mm), and press Enter. This helps you accurately position walls.
Draw multiple guides depending on the number of interior walls you need.
Draw the Interior Walls:
Select the Line tool and begin drawing edges based on the guides you’ve created. The guides ensure that your walls are straight and properly aligned.
Use the Eraser tool to delete the guides once your walls are in place.
Clean Up Extra Segments:
Zoom in if necessary and delete any extra edge segments that might have been created during the drawing process. Make sure each interior wall forms a closed loop, ready to be extruded into 3D.
Now you’ve laid the groundwork for your design by setting both the exterior and interior walls with accuracy and organization.
Tips and Tricks for Efficient Use
Use Guides: When creating interior walls or precise details, guides can help you maintain accuracy. Use the Tape Measure tool to create guides for precise placement.
Keyboard Shortcuts: Speed up your workflow by using keyboard shortcuts. For example, ‘L’ is for the Line tool, ‘R’ is for Rectangle tool, and ‘P’ is for Push/Pull tool.
Orbit and Pan Carefully: When working in 2D, avoid using the Orbit tool, as it will switch your view to 3D. Stick to Zoom and Pan to navigate your plan.
Common Mistakes to Avoid
Not Grouping Elements: If you don’t group different parts of your model, you might accidentally modify the wrong element while working. Always group walls, furniture, or objects to keep things organized.
Neglecting Accurate Measurements: In design, precision is key. Always use the Measurements Box to input exact dimensions, ensuring your design is accurate.
Overlooking the 2D View: When drafting a plan, work in 2D mode and avoid accidentally orbiting to 3D. Stick to Top view and Parallel Projection to keep everything on track.
Conclusion: Your First SketchUp Project Is Just the Beginning
Now that you’ve created your first basic plan in SketchUp, you’re well on your way to mastering this powerful design tool. With its easy-to-use features and flexible modeling options, SketchUp is ideal for anyone looking to visualize their architectural or interior design projects.
Key Takeaways:
SketchUp is an intuitive, beginner-friendly tool for creating 2D plans and 3D models.
Start with basic shapes and add complexity as you become more comfortable with the tools.
Use groups and guides to stay organized and precise.
Avoid common mistakes like neglecting measurements or using the wrong tools.
Start Your Architectural Journey with a Free Design Package!
Now, begin your architectural future by downloading our FREE Basic Architecture Design Package with a Lumion file! Discover the power of rendering and the endless possibilities of architectural design. To begin, please click the following link to obtain the file on our website:
https://portfolio.hotrongnhan.org/
Take advantage of this great chance to improve your skills and bring your ideas to life. Download today to open the door to architectural excellence!
Excited to announce that the Lumion rendering course I've created on Udemy has attracted over 4,000 registrations! This course is tailored for architecture enthusiasts.
Check it out here: Lumion Course on Udemy.
Moreover, an exciting gift for aspiring architects is a free access code to experience the course. Drop me a message to get the code!
Embark on this fresh, creative journey with us!